
When you make an awesome song or beat that you're proud of in GarageBand for iOS, one way to show it off is to turn it into a ringtone or alert tone for your iPhone. That way, anytime you get a phone call or a notification, your musical creation will sound off, and everyone around you will hear it in all its glory. Plus, it's way cheaper to make your tones than to buy them off of iTunes.
We won't get into how to create a song or soundbite in GarageBand that you can use a ringtone or alert tone on your iPhone. However, we will cover some basic facts about using tones, how to save your custom-made music into ringtone and alert tone files, and how to access those files to customize your alert experience.
Step 1: Know Your Tone Limits
When it comes to using sounds for incoming calls, text alerts, new voicemails, new emails, and so on, there are two different types you can use: ringtones and alert tones. However, whenever you make custom tones, they will always be considered "ringtones" as there is no way to separate your custom music creations into the "alert tones" category.
You can buy alert tones that show up as such, but Apple locked this category down for some reason in iOS. However, you can still make alert tones to use for notification alerts — they'll just always be listed as a ringtone on your iPhone, so make sure you understand that before continuing.
On that note, depending on what you want to use your custom tone for, there are two time limitations. In general, ringtones can be no longer than 40 seconds total, and alert tones can be no longer than 30 seconds. If you have a 31-second tone, it will only be available to use a ringtone, not an alert tone for other notifications.
However, since there is no easy way to see how long your song is in GarageBand for iOS, this doesn't matter. GarageBand will convert your custom song to 30 seconds automatically if it's too long, cutting off whatever can't fit and adding a tasteful fade. So no matter what length of song you create in GarageBand, it will be available to be used as a ringtone or an alert tone.
Step 2: Save Your Song as a Ringtone
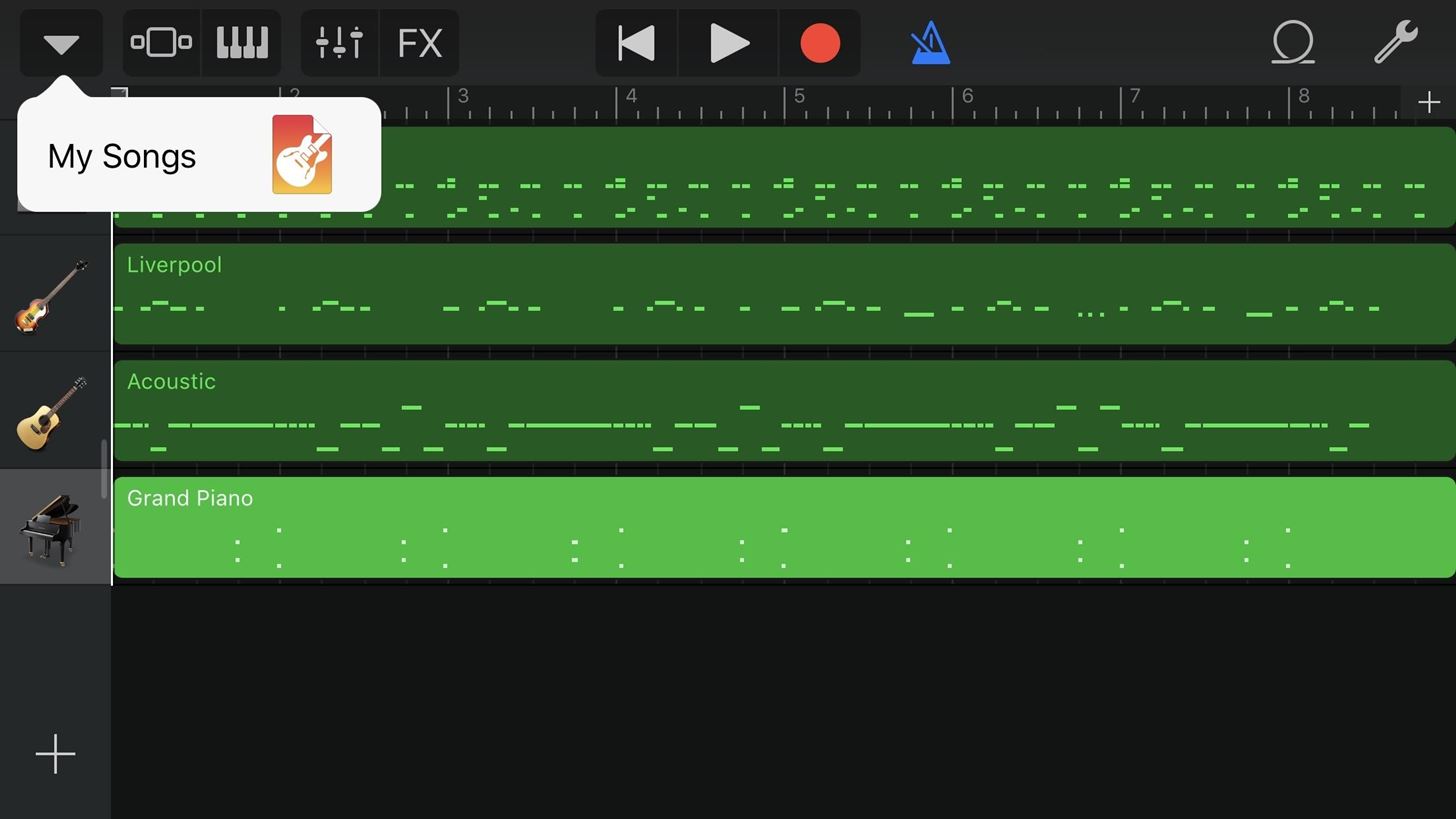
You don't need to open your song to save it as a ringtone. However, if your song happens to be open already, tap the down arrow in the top-left corner, then tap "My Songs" to return to the main screen.
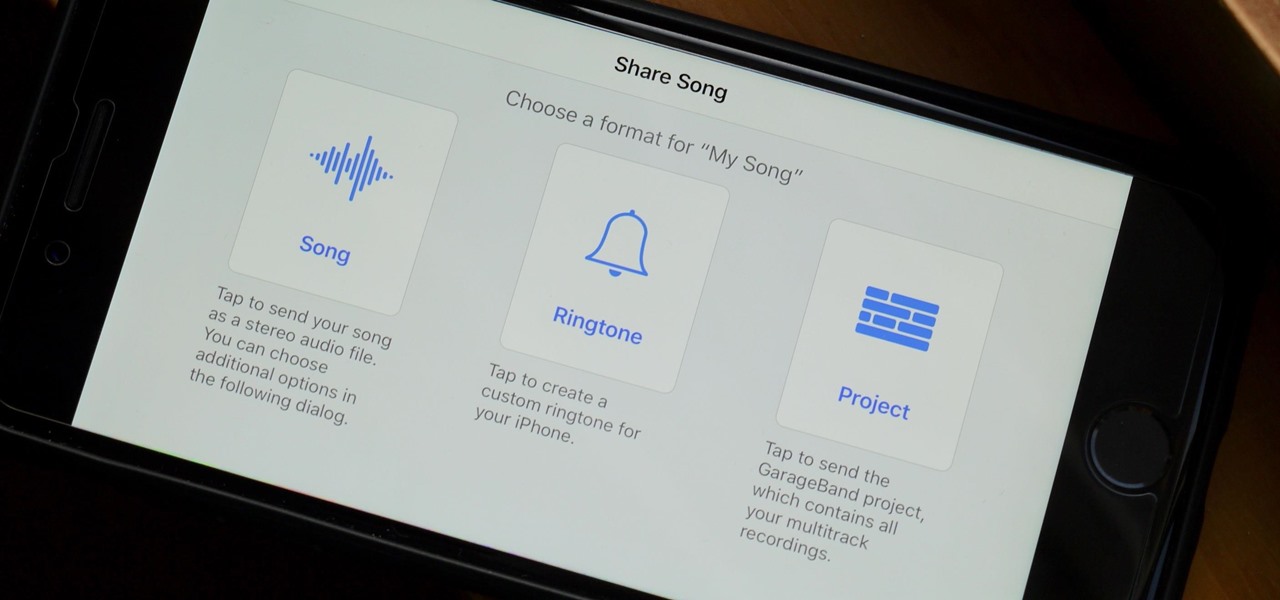
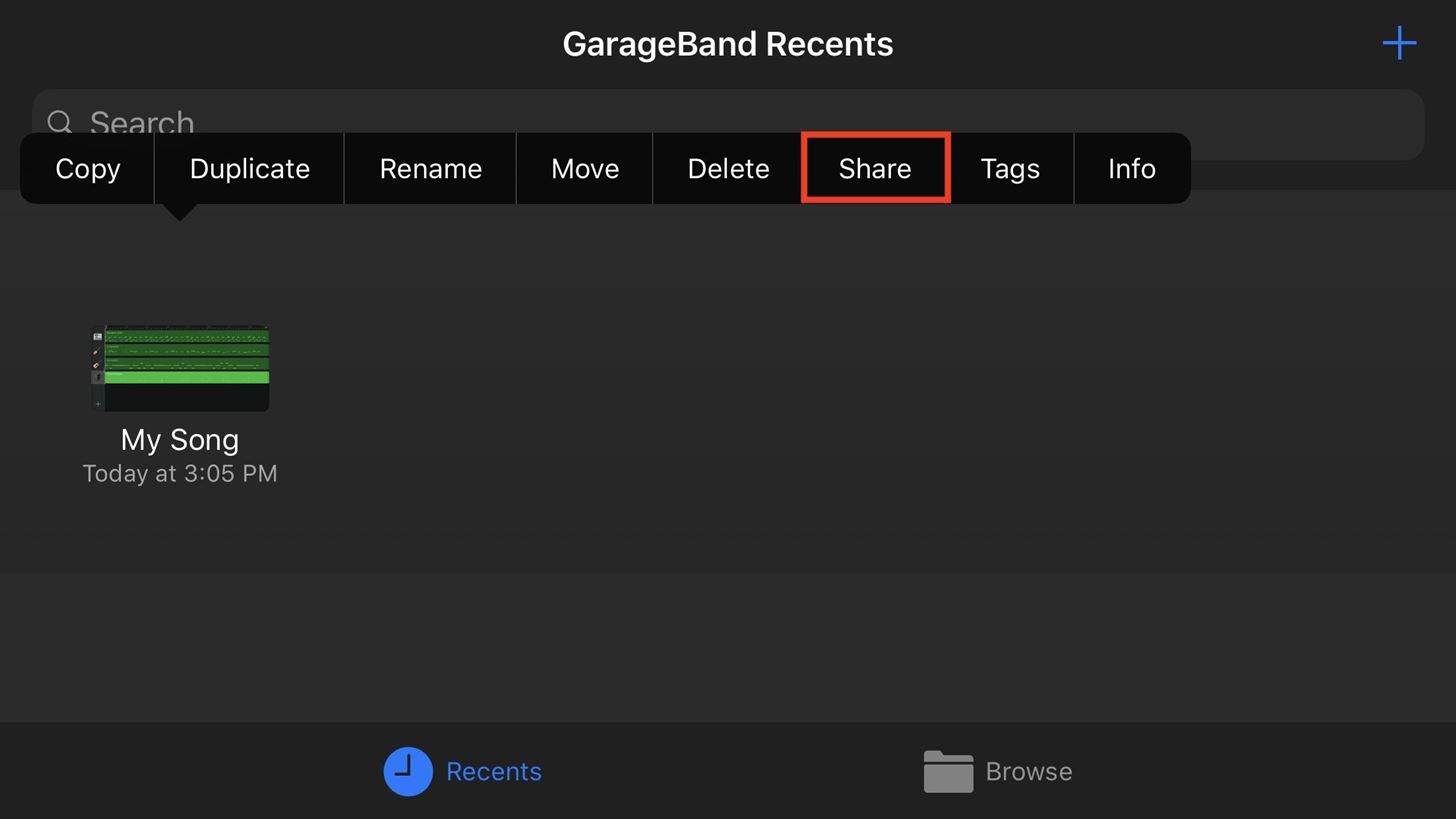
Once in "My Songs," tap-and-hold on the song you'd like to turn into a ringtone. When the prompts appear above your song, let go of the file, then tap "Share." Alternatively, you can also tap on "Select" in the top right, if inside of the "Browse" folder, then tap the song you want, followed by the share sheet icon.
When the Share Song screen appears, tap "Ringtone." This option will convert your song into a ringtone file (.m4r) instead of an .m4a, .mp3, or another type of sound file. Ringtone files are the only file type that iPhones will read for tones, so it's essential you choose this setting.
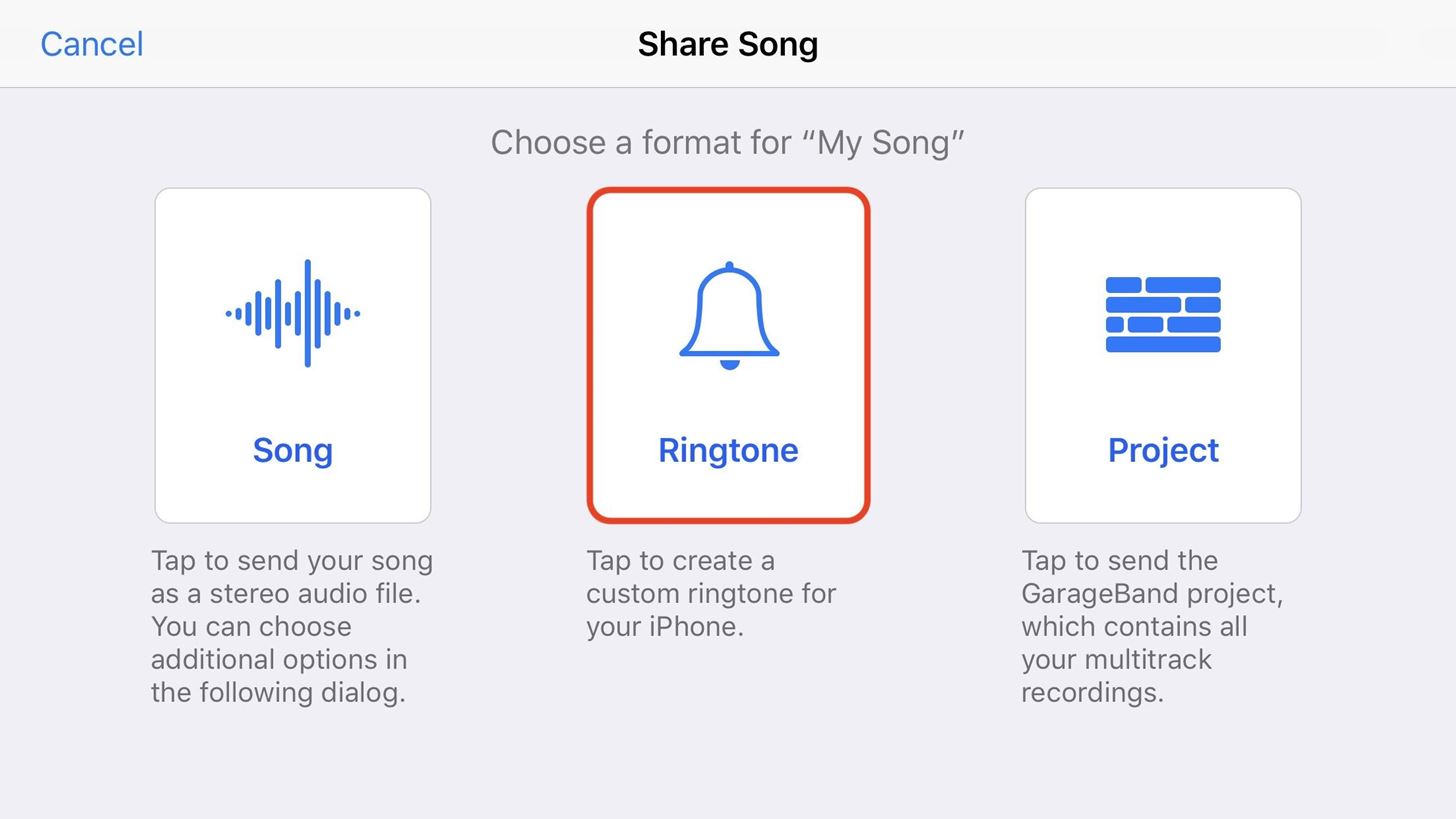
Once you've tapped "Ringtone," an Export Ringtone pop-up window will appear. If your song was over 30 seconds, you'd first get a prompt saying that "Your ringtone length needs to be adjusted," so tap on "Continue" there to get to the Export Ringtone window.
Now, you can change the name of your ringtone by tapping on its title under Name of the Ringtone. You can also view any previously created ringtones by tapping "Your Ringtones." When finished, tap "Export."
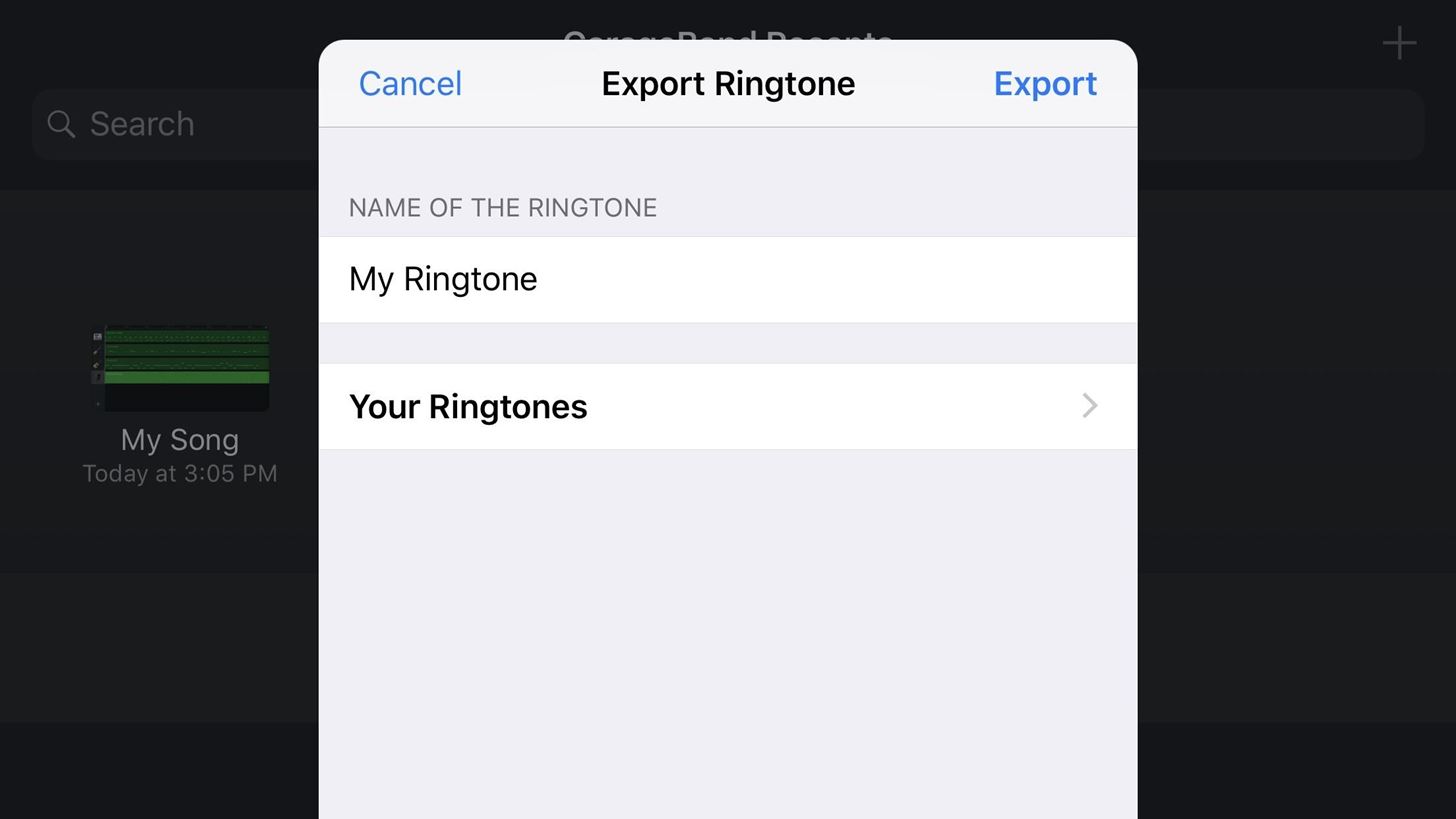
You do have the option to cancel an export in-progress by tapping the (X) that appears next to "Exporting as Ringtone." However, your ringtone may export too fast for you to hit this button, especially if the song does not have many layers or if you're using a newer iPhone.

Step 3: Assign Your New Tone
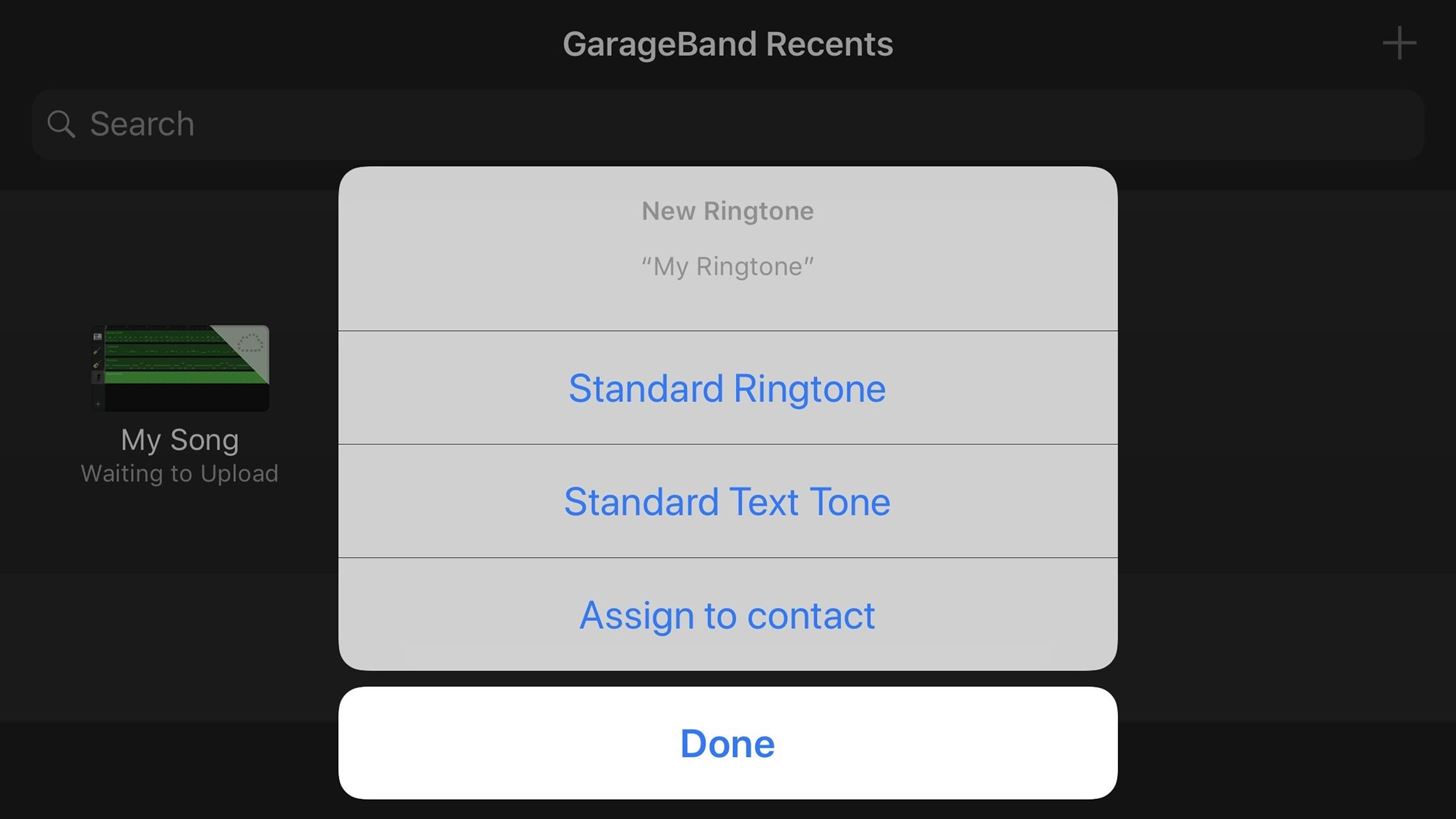
Congratulations! Your ringtone has now exported. But your job isn't over yet. You need to decide what your custom tone's purpose will be on your iPhone. On the confirmation prompt, you can tap "OK" to let your song save as a ringtone in your Settings automatically. For help on finding it, check out the next step.

If you don't want to do it later, as seen in the following step, you can tap "Use sound as..." instead to set it right away as either your default ringtone, default text tone, or as a ringtone or text tone assigned to a specific contact.
- Standard Ringtone: This will automatically make your primary ringtone on your iPhone this new custom song. If it's a short music clip, it will just loop until you answer the call, until it goes to voicemail, or until you silence it.
- Standard Text Tone: Just like the ringtone, this will automatically make your primary text tone on your iPhone this new custom song. In many cases, you probably won't want a text tone that lasts for up to 30 seconds, since alert tones only sound once and don't loop, so this is best used for shorter clips.
- Assign to contact: Selecting this will open your contact list. Choose a name you want to assign your custom song to, then tap on either "Assign as Text Tone" or "Assign as Ring Tone," depending on what you want. If you want it for both, only select one then go into your contacts list manually to add it as the other option, because if you do this process twice, you're just going to duplicate your tone which will clutter things up.
Step 4: Do More with Your New Tone
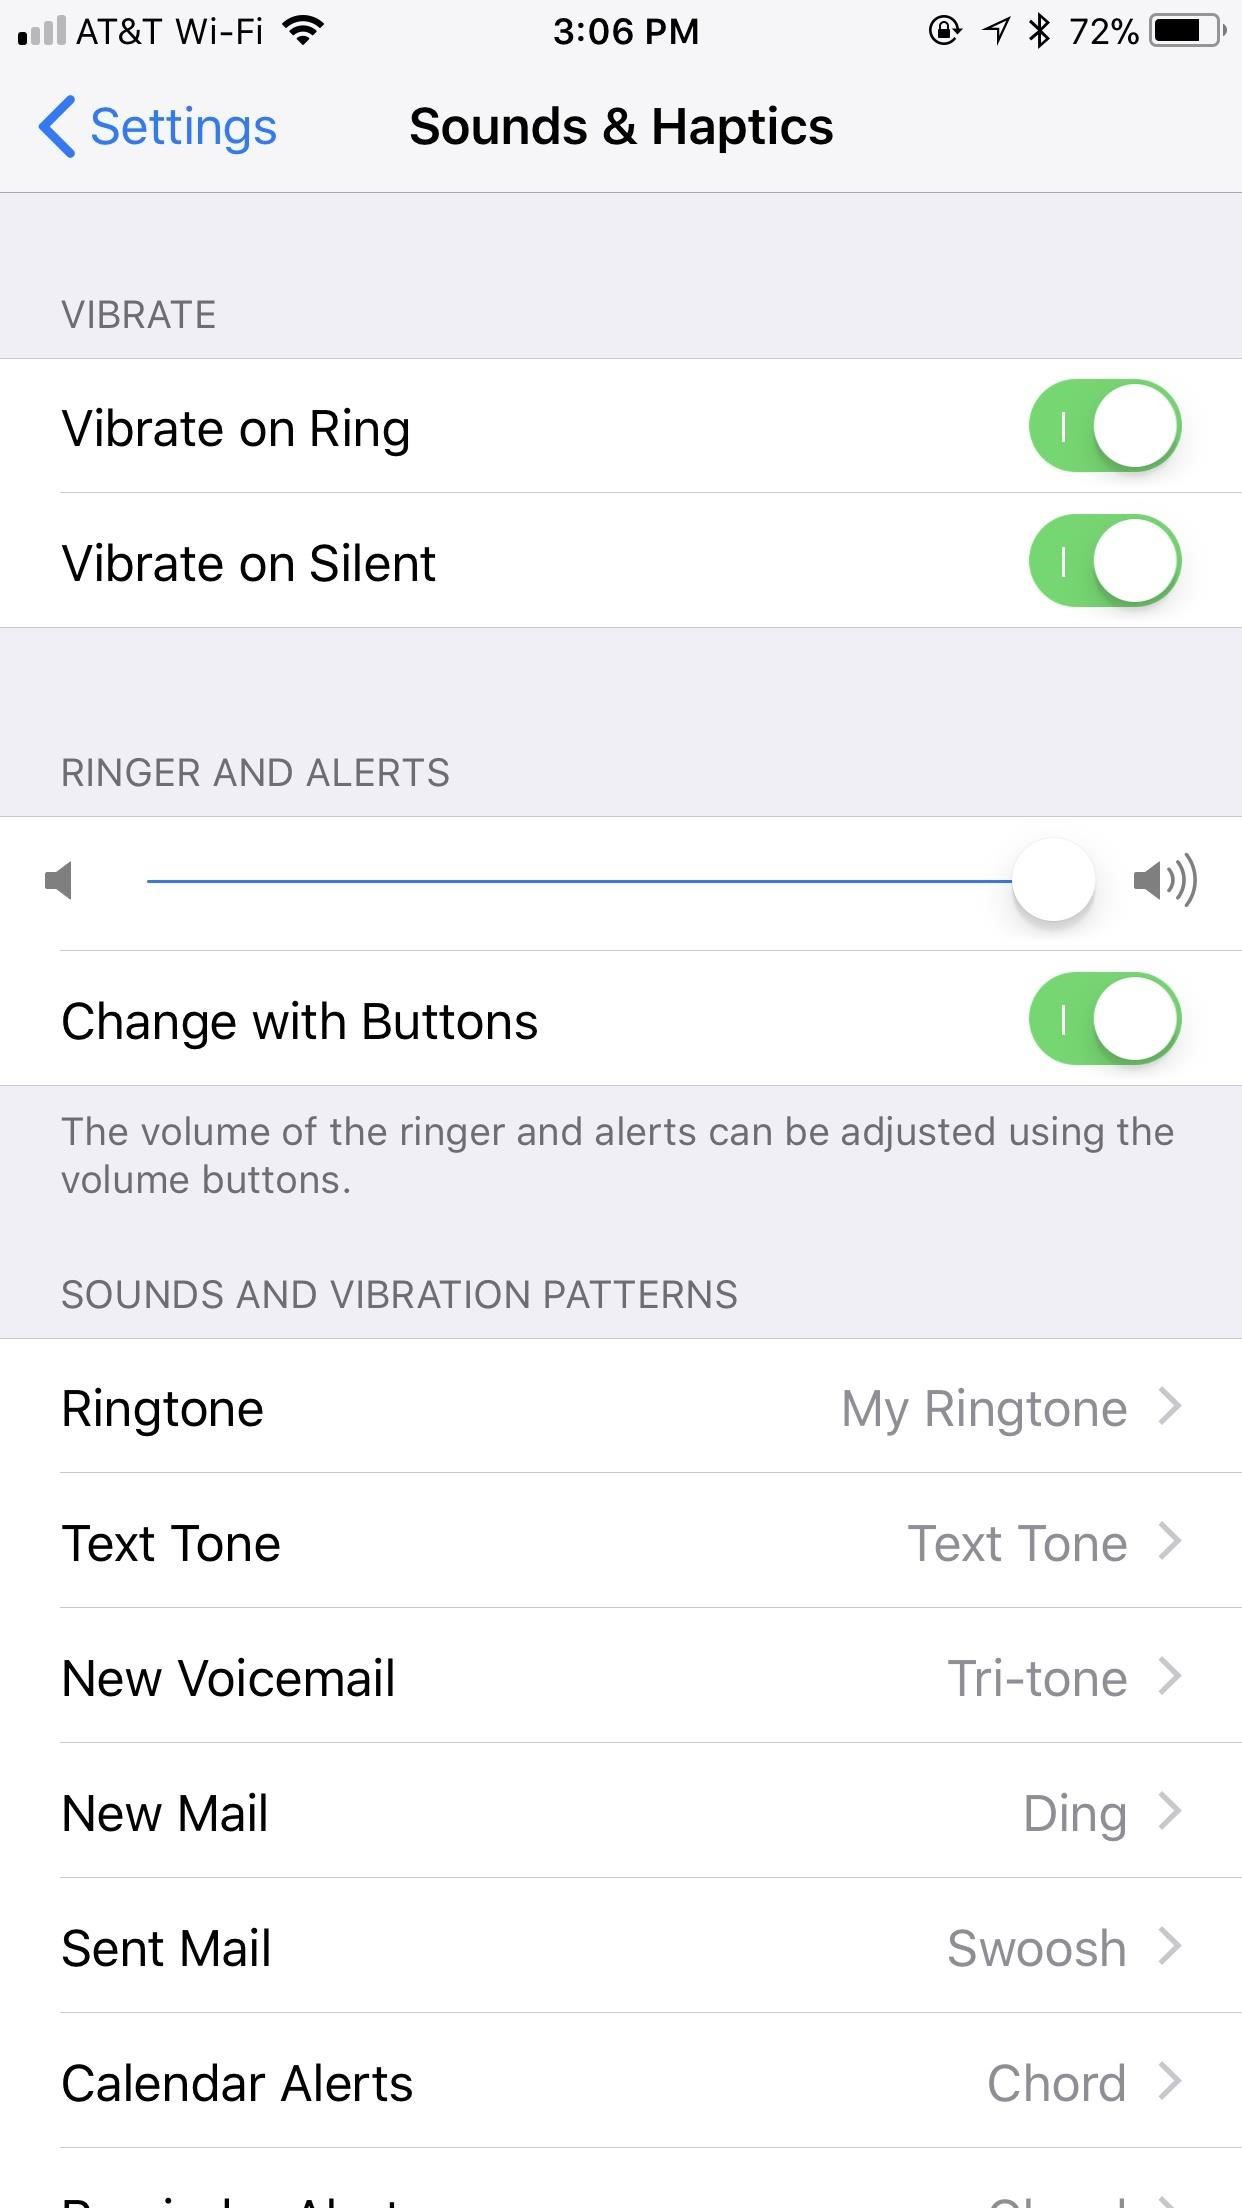
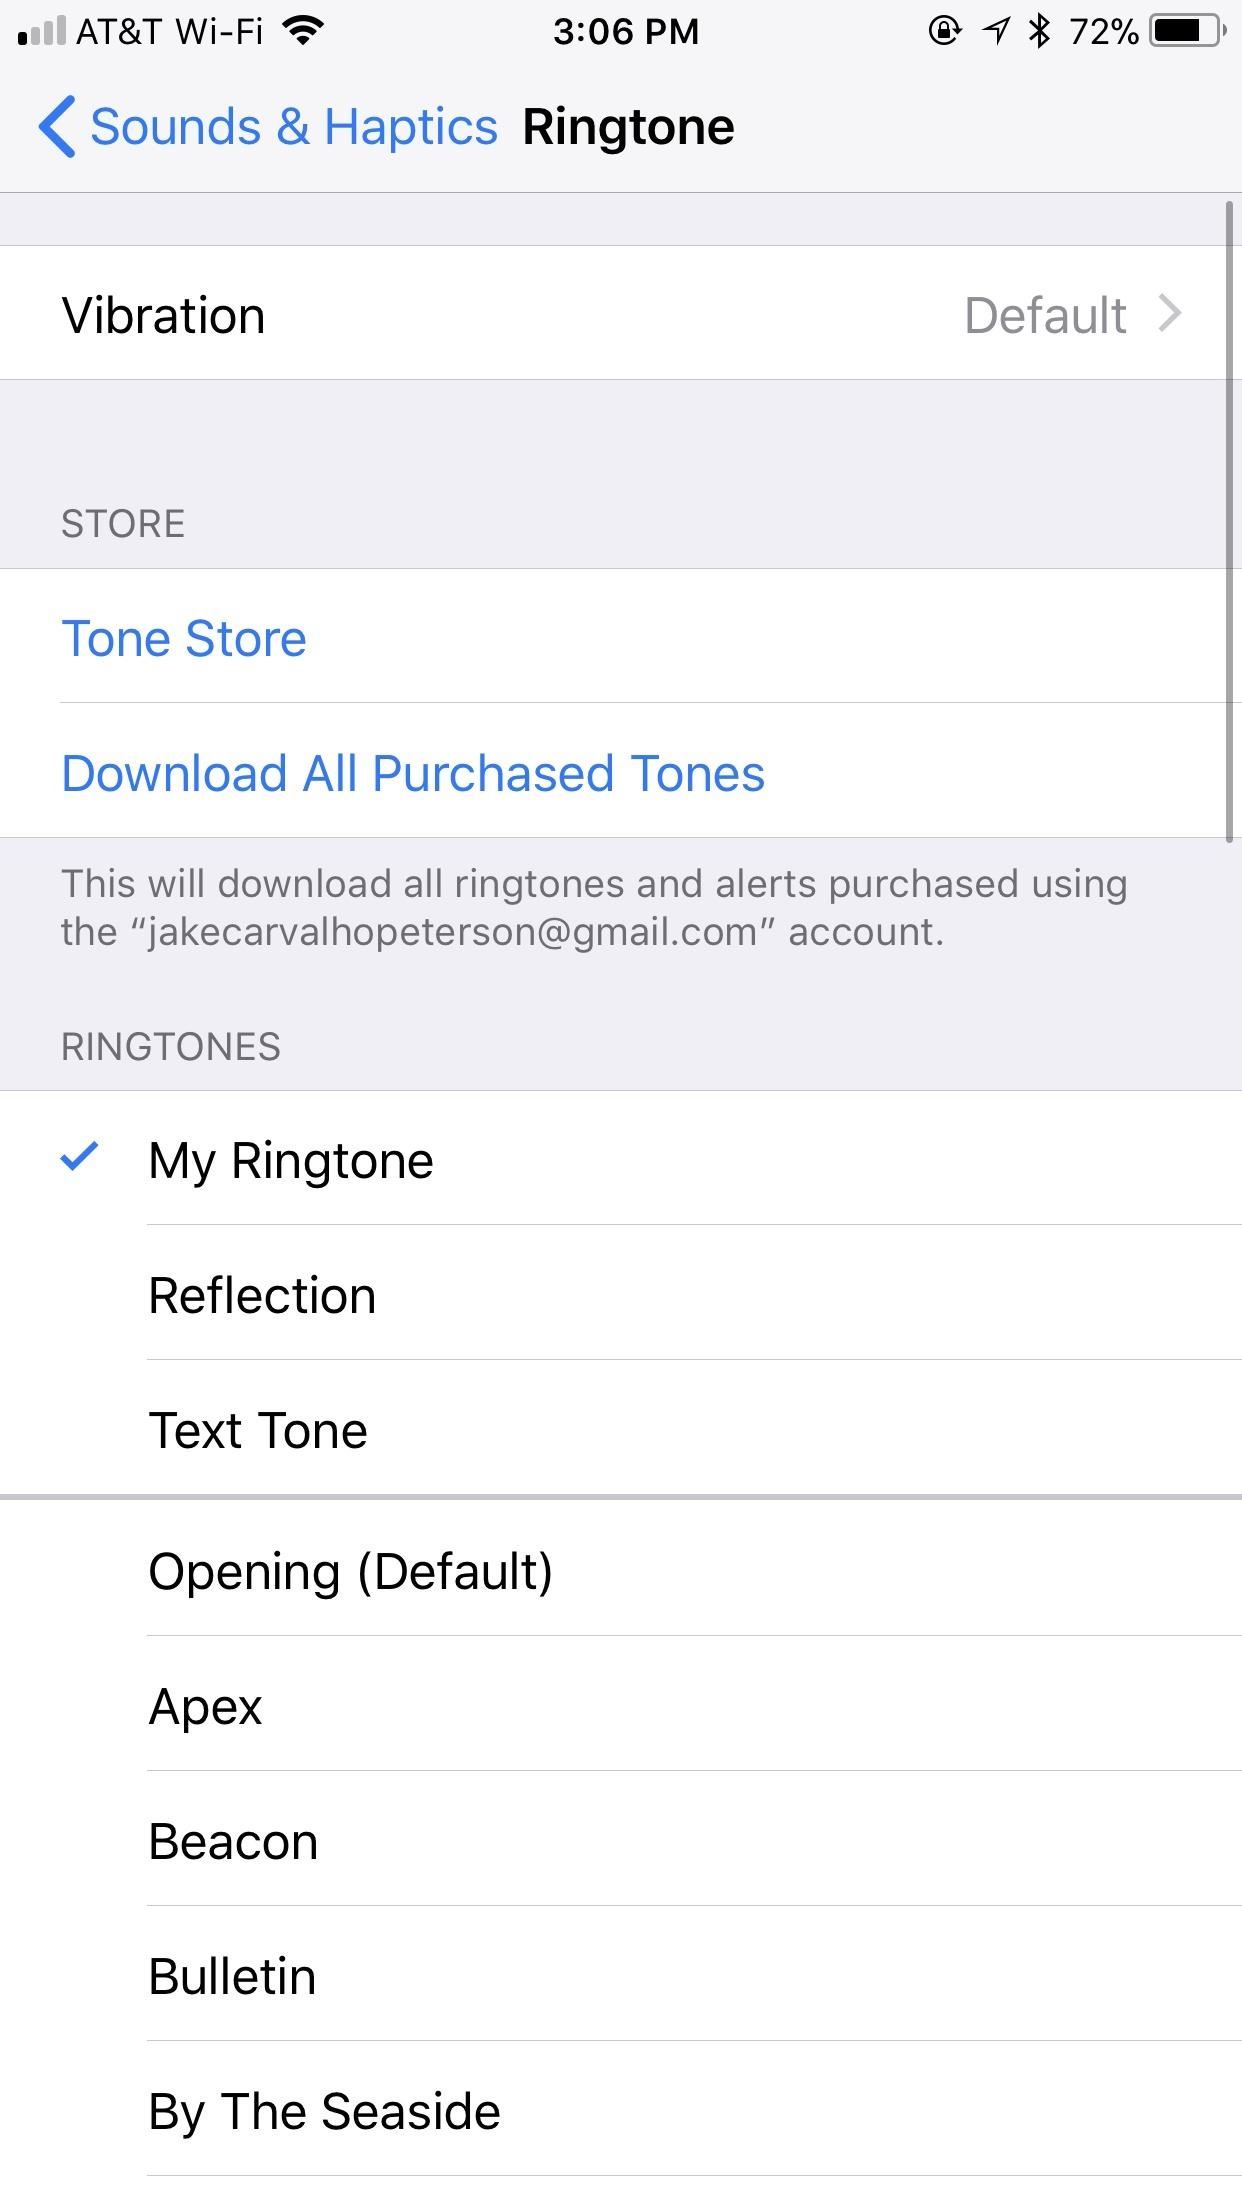
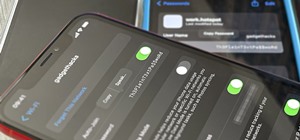
To view your newly created ringtone, open your Settings app, then tap "Sounds & Haptics." Choose an option under Sounds and Vibration Patterns to see your song listed under Ringtones. You can make this new tone the ringtone, text tone, or alert tone for any option under Sounds and Vibration Patterns, such as "New Mail," "Calendar Alerts," or "AirDrop."
To assign your tones to contacts, open up the Contacts app or the "Contacts" tab in Phone, select the contact, hit "Edit," then select "Default" next to Ringtone or Text Tone to choose your new song.
You can also use your song for any apps that allow you to customize your alert tones, but not all third-party apps will see all of your tones. For instance, WhatsApp will only show the default alert tones, it will not show ringtones, custom tones, or any tones purchased from iTunes.
Now, as we said before, all tones you create will be listed as ringtones, and there's no way to make them appear in the alert tone section along with all of the other alert tones. Hopefully, Apple will open up the alert tones section just like they did with ringtones, but until then, this is better than nothing.
This article was produced during Gadget Hacks' special coverage on streaming, listening to, and creating music and podcasts on your smartphone. Check out the whole Music and Audio series.
Just updated your iPhone? You'll find new emoji, enhanced security, podcast transcripts, Apple Cash virtual numbers, and other useful features. There are even new additions hidden within Safari. Find out what's new and changed on your iPhone with the iOS 17.4 update.


Be the First to Comment
Share Your Thoughts